How to add your own custom fonts to Squarespace with CSS (7.0 & 7.1)
Squarespace has an extensive library of fonts to choose from for your website. You can find the library by navigating to:
Design > Site Styles > Fonts > Headings or Paragraphs > Family > Browse fonts here
If your brand fonts are not included in Squarespace, you can add a custom font in a few easy steps. Follow along this tutorial to learn how to add your own custom font to Squarespace!
Step 1: Upload your custom font to Squarespace
From the Squarespace dashboard, go to: Design > Custom CSS
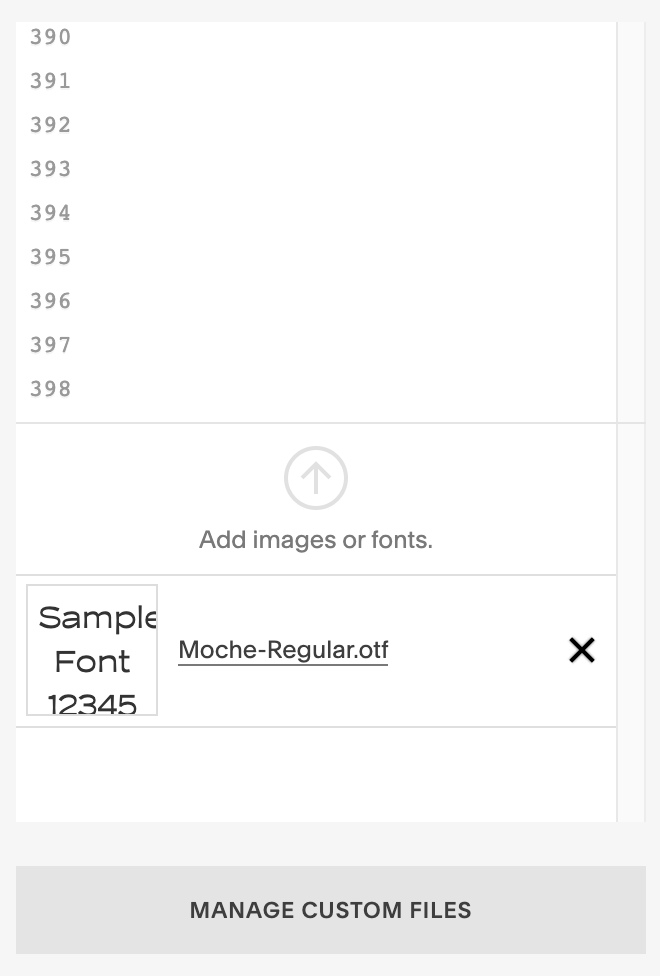
Scroll down till you see “Manage Custom Files”
Click “Add images or fonts”
Select the font file you’d like to import to Squarespace (note: files should end with OTF, WOFF or TFF)

Step 2: Add the following CSS
SQUARESPACE 7.0:
This version of Squarespace includes four typography options for heading and paragraph text: H1, H2, H3, and P.
Copy and paste the code in Custom CSS for version 7.0:
// CUSTOM FONT

@font-face {

font-family: FONTNAME;

src: url();
}


h1 {

font-family: 'FONTNAME';}


h2 {

font-family: 'FONTNAME';}


h3 {

font-family: 'FONTNAME';}

h4 {

font-family: 'FONTNAME';}


p {

font-family: 'FONTNAME';}
SQUARESPACE 7.1:
This version of Squarespace includes six options for heading and paragraph text: H1, H2, H3, P1, P2, P3.
NOTE: For P1 and P3, make sure to use .sqsrte-small and .sqsrte-large.
Copy and paste the code in Custom CSS for version 7.1:
// CUSTOM FONT

@font-face {

font-family: 'FONTNAME';

src: url();

}


h1 {

font-family: 'FONTNAME';}


h2 {

font-family: 'FONTNAME';}


h3 {

font-family: 'FONTNAME';}


h4 {

font-family: 'FONTNAME';}


.sqsrte-large {

font-family: 'FONTNAME';}


p {

font-family: 'FONTNAME';}


.sqsrte-small {

font-family: 'FONTNAME';}
Step 3: implement your custom font
Now that you’re all set up, let’s add your custom font to the code.
At the top of the code snippet, you’ll see this:
@font-face {

font-family: 'FONTNAME';

src: url();

}
Replace 'FONTNAME' with your font name.
NOTE: this doesn’t have to match the real name of the font — it can be anything you want.
Then, click between the parentheses of src: url(); so your cursor is sandwiched between the two.
When your cursor is sandwiched between the two parentheses, navigate back to “Manage Custom Files” at the bottom, click on the font you previously uploaded and it will automatically populate a URL for the custom font.
It should look like this:

Now that the font is active, we need to apply it to our headings and paragraphs.
To do so, replace 'FONTNAME' with the font name you chose at the beginning of step 3.
h1 {

font-family: 'FONTNAME';}
Repeat this step for all heading and paragraph text.
NOTE: if you want to implement multiple fonts, you will need to add this code snippet twice and use unique font names. For example:
@font-face {

font-family: 'FONTNAME';

src: url();

}


@font-face {

font-family: 'FONTNAME';

src: url();

}
When you’re done, the final code should look like this:

Step 4: Customize font style
To customize your font size, letter spacing & line height, navigate to: Site Styles > Fonts and edit font style.
PIN IT FOR LATER!